Support Center

Find your answer in our knowledge base

How To Exclude Specific URLs And IPs From Your Bot?

Here in this documentation learn how can you exclude specific URLs and IPs from your bot!

Exclude URLs:

In order to exclude your bot from specific URLs. Follow the following steps:

  1. Go to website setting
  2. Tap on the exclusion setting
  3. In this section, you can insert multiple links by simply adding “enter”
  4. Replace your script with this code:

<script>  !function() {  var t; if (t = window.botsify = window.botsify = window.botsify || [], !t.init) return t.invoked ? void (window.console && console.error && console.error(“Botsify snippet included twice.”)) : (  t.load =function(e){ var o,n; o=document.createElement(“script”); e.type=”text/javscript”; o.async=!0; o.crossorigin=”anonymous”;  o.src=”https://botsify.com/web-bot/script/frame/”+e+”/botsify.js?referer=” + window.location.href;n=document.getElementsByTagName(“script”)[0]; n.parentNode.insertBefore(o,n); });  }(); botsify.load(YOUR BOT API KEY); </script>

Exclude IPs:

In order to exclude your bot from specific URLs. Follow the following steps:

  1. Go to website setting
  2. Tap on the exclusion setting
  3. In this section, you can insert multiple links by simply adding “enter
  4. Replace your script with this code:

<script>

  var ip =  “<?php echo $_SERVER[‘REMOTE_ADDR’]; ?>”;

 !function() {

 var t; if (t = window.botsify = window.botsify = window.botsify || [], !t.init) return t.invoked ? void (window.console && console.error && console.error(“Botsify snippet included twice.”)) : (

 t.load =function(e){ var o,n; o=document.createElement(“script”); e.type=”text/javscript”; o.async=!0; o.crossorigin=”anonymous”;

 o.src=”https://botsify.com/web-bot/script/frame/”+e+”/botsify.js?referer_ip=” + ip; n=document.getElementsByTagName(“script”)[0]; n.parentNode.insertBefore(o,n); });

 }(); botsify.load(YOUR BOT API KEY);

</script>

How to create SMS Chatbot with Twilio

Connect your Twilio account with Chatbot and send automated SMS replies to customers. SMS chatbot can enhance your customer service and experience at a great level and provide you ease in managing your daily text messages.

Here’s how you can connect Twilio with Botsify

3 simple steps:

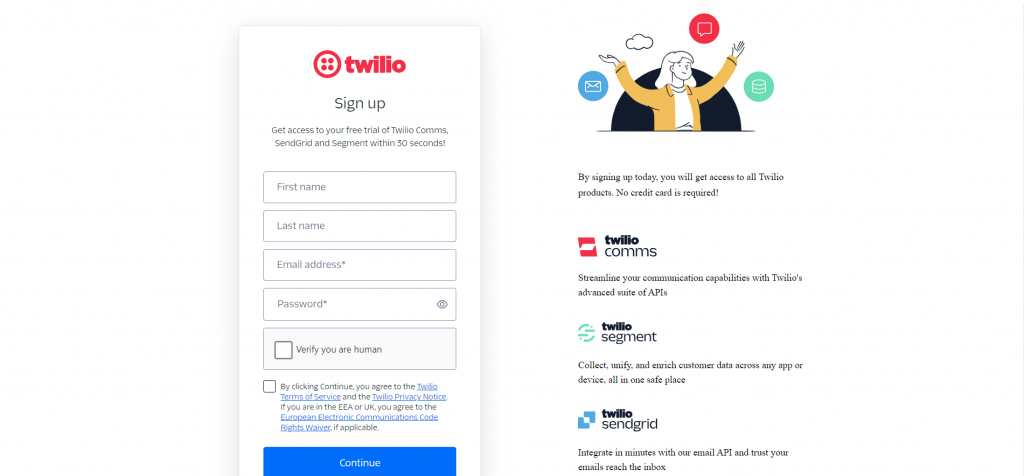
Create Twilio Account

  • Visit Twilio
  • Create a Twilio account

Twillio sign up page

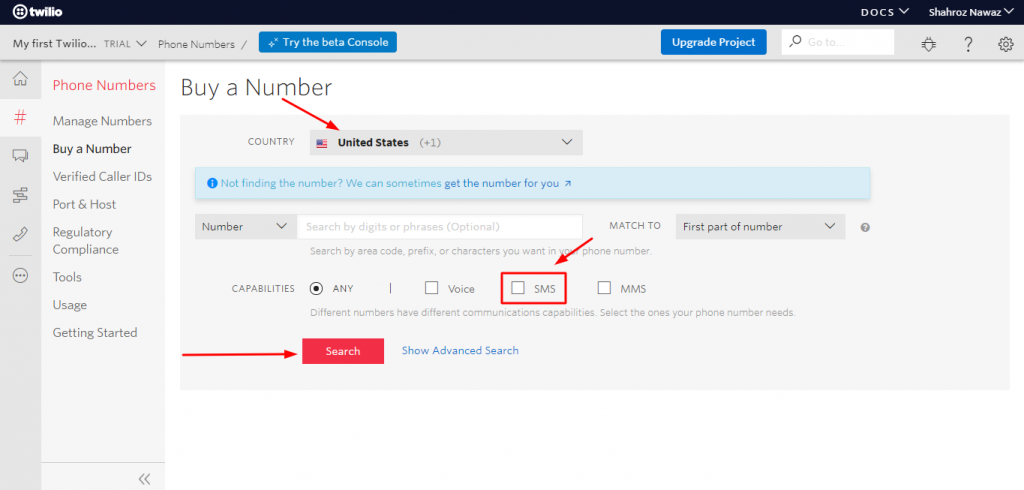
Buy a Number

  • Buy a Number

Connect Botsify

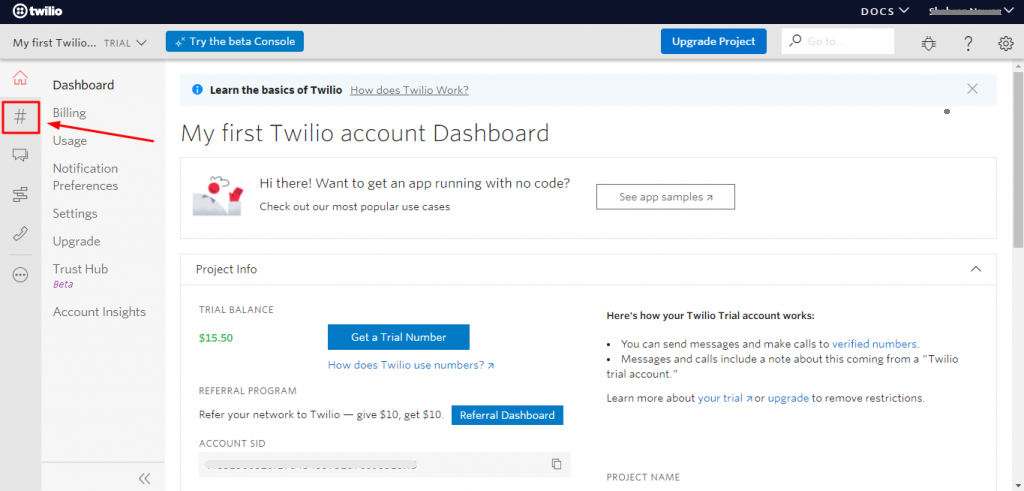
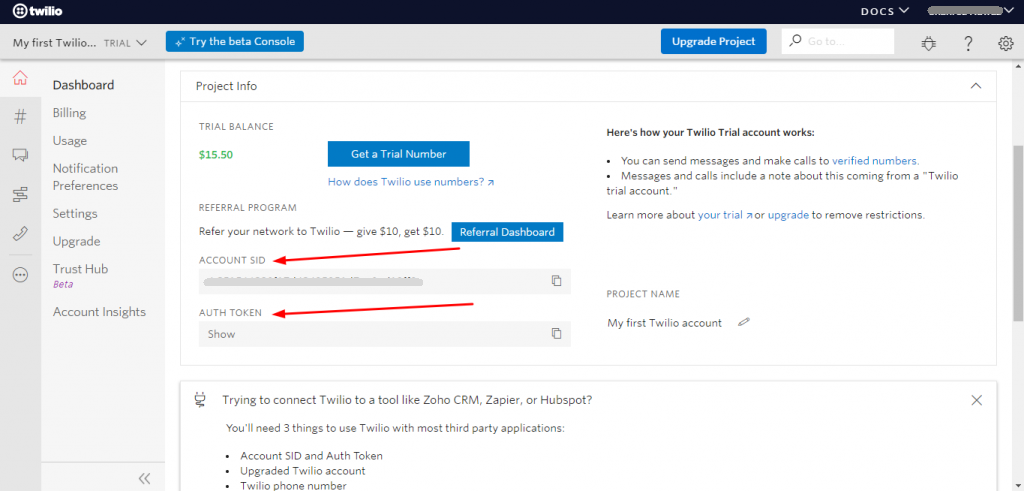
  • Open Twilio Dashboard
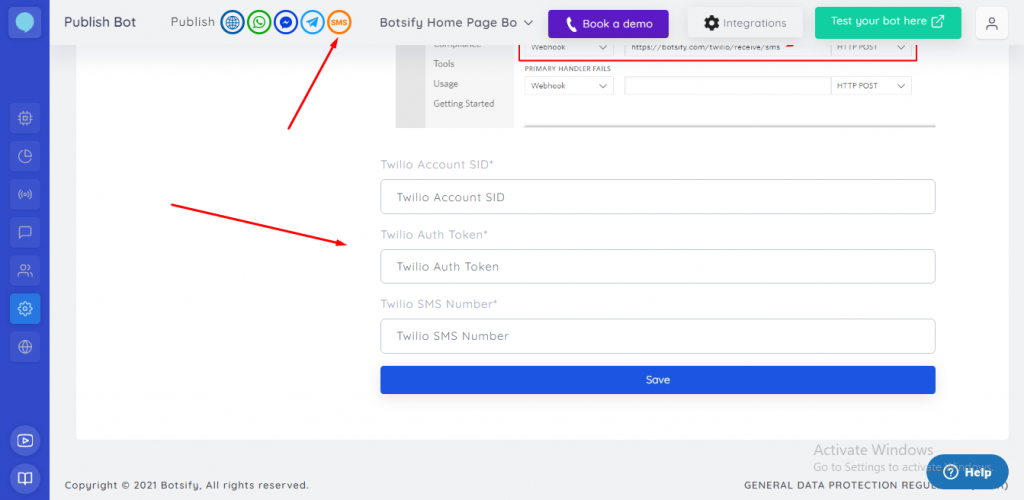
  • Copy the Account SID, Auth Token, and Number

  • Paste the credentials on Botsify Connect to Twilio

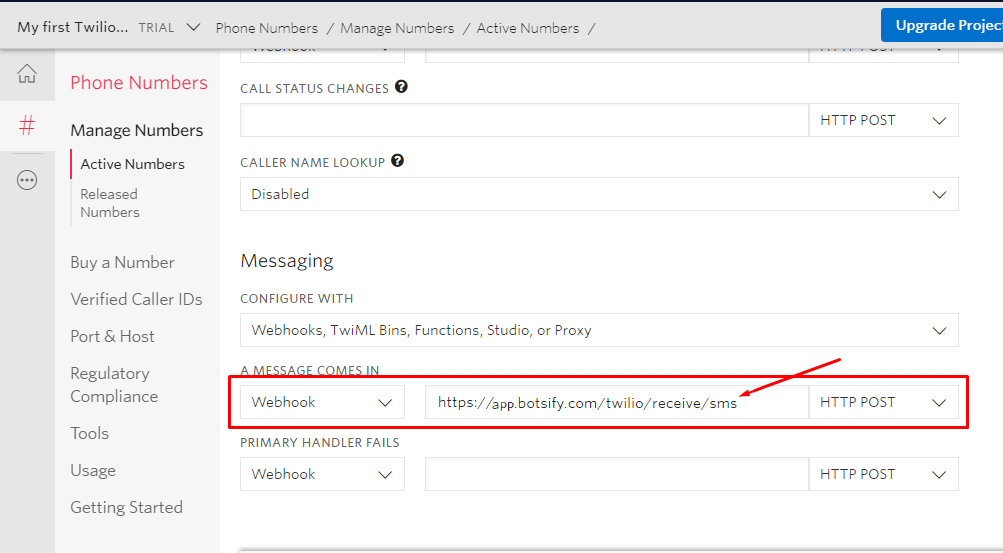
  • Set the Twilio SMS Webhook

And that’s it! You have connected botsify with Twilio, try sending messages now!

How to Integrate Botsify Chatbot with Shopify

Today we are going to learn how to connect your bot with your Shopify through Integromate.

Like many other integrations, Botsify allows you to connect your Shopify with your chatbot you can easily get the queries you wanted to answer on your Integromate Shopify. You can send broadcasts, receive form submissions and send automated out of office messages using Botsify for Shopify.

In order to start, you will first have to go to log in to your Botsify account and your Integromate account.

Then select the bot you want to integrate with your Shopify or create a new chatbot if required.

Once you are in, go to the chatbot dashboard and You can see there are steps given here already, what you need to do is follow these steps one by one and your bot will be up and running on Shopify.

First, go to the story tab and create a story you want to answer through Shopify:

After creating a story go to the edit story button and if you have already an existing story you wanted to integrate you can also go to that story and click on the edit story button.

After clicking on the edit button you will land on the editing page and now you have to choose plugins for you, so simply click on plugin then.

As you click on the plugin you got a pop-up of the different plugin options select Jason API. Now you get another popup of the Jason API tab where you have to write an API endpoint and had to select the request type.

Paste your Integromate webhook API’s URL in your Plugin API endpoint section.
And select POST as the request type.

Now save this story and also on Integromate page click on RUN to execute it Now this setting is saved in both platforms and your bot is connected to Integromate now let’s connect your Shopify.

Click on the adding button on your webhook. You will get a ‘?’ icon click on it and choose Shopify as integration. Write any title or name you want to this connection and add the shop name also.


After saving Shopify as a connection they will redirect you to your signed-in Shopify account click on allow to connect your Shopify.

After allowing the connection on Shopify with Integromate select a title as end-user-msg, change the status to published and choose the limit. You can also feed further settings as much as you want…

Finally! Save the settings and now you will be able to receive the bot messages on the Shopify you choose.


That’s how when you receive a message on chatbot you will also get it on your selected Shopify

That’s it, your Shopify is now integrated with Botsify!

How to Integrate Botsify Chatbot with Slack

Today we are going to learn how to connect your bot with your Slack app workspace through Integromate.

Like many other integrations, Botsify allows you to connect your workspace with your chatbot you can easily get the messages you wanted to answer on your slack app. You can send broadcasts, receive form submissions and send automated out of office messages using Botsify for Slack.

In order to start, you will first have to go to log in to your Botsify account and your Integromate account.

Then select the bot you want to integrate with your slack workspace or create a new chatbot if required.

Once you are in, go to the chatbot dashboard and You can see there are steps given here already, what you need to do is follow these steps one by one and your bot will be up and running on slack.

First, go to the story tab and create a story you want to answer through slack:

After creating a story go to the edit story button and if you have already an existing story you wanted to integrate you can also go to that story and click on the edit story button.

edit story

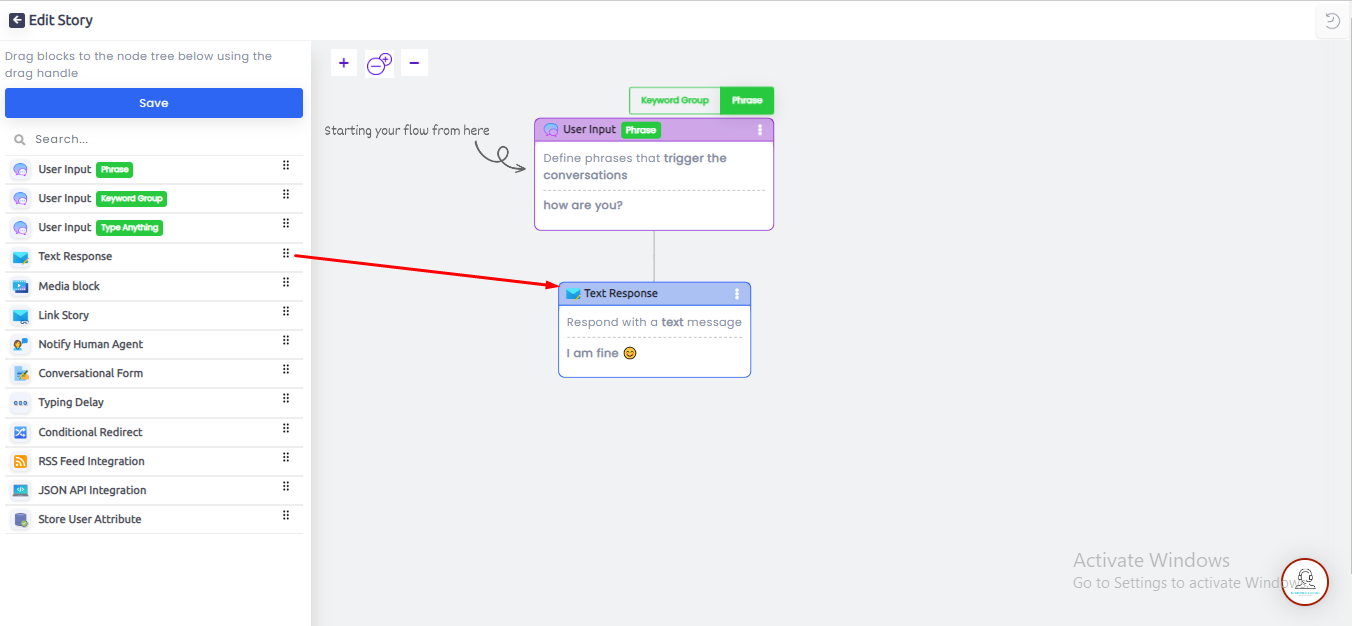
After clicking on the edit button you will land on the editing page now drag the  JSON API integration node and attach it to the user input to integrate JSON API with the story.

json api drag

Now you get a popup of the Jason Integration tab where you have to write an API endpoint and had to select the request type.

json api input

Paste your Integromate webhook API’s URL in your Plugin API endpoint section. And select POST as the request type.

slack integration

Now save this story and also on the Integromate page click on RUN to execute it Now this setting is saved in both platforms and your bot is connected to Integromate now let’s connect your slack.

Click on the adding button on your webhook. You will get a ‘?’ icon click on it and choose Slack as integration. Write any title or name you want to this connection and save it.


After saving slack as a connection they will redirect you to your signed-in slack account click on allow to connect your slack.

After allowing the connection on Slack with Integromate select a Slack channel you want to receive messages, and you can enter a relevant Text also.

Finally! Save the settings and now you will be able to receive the bot messages on the Slack channel you choose.

That’s how when you receive a message on the chatbot you will also get it on your selected slack channel.

That’s it, your Slack is not integrated with Botsify!

How to Connect Slack to your Botsify Account

Today we will learn how to connect your bot with your Slack app workspace

Like many other integrations, Botsify allows you to connect your workspace with your chatbot

You can send broadcasts, receive form submissions, and send automated out of office messages using Botsify for Slack

In order to begin, you will first have to go to log in to your account and then select the bot you want to integrate with your slack workspace

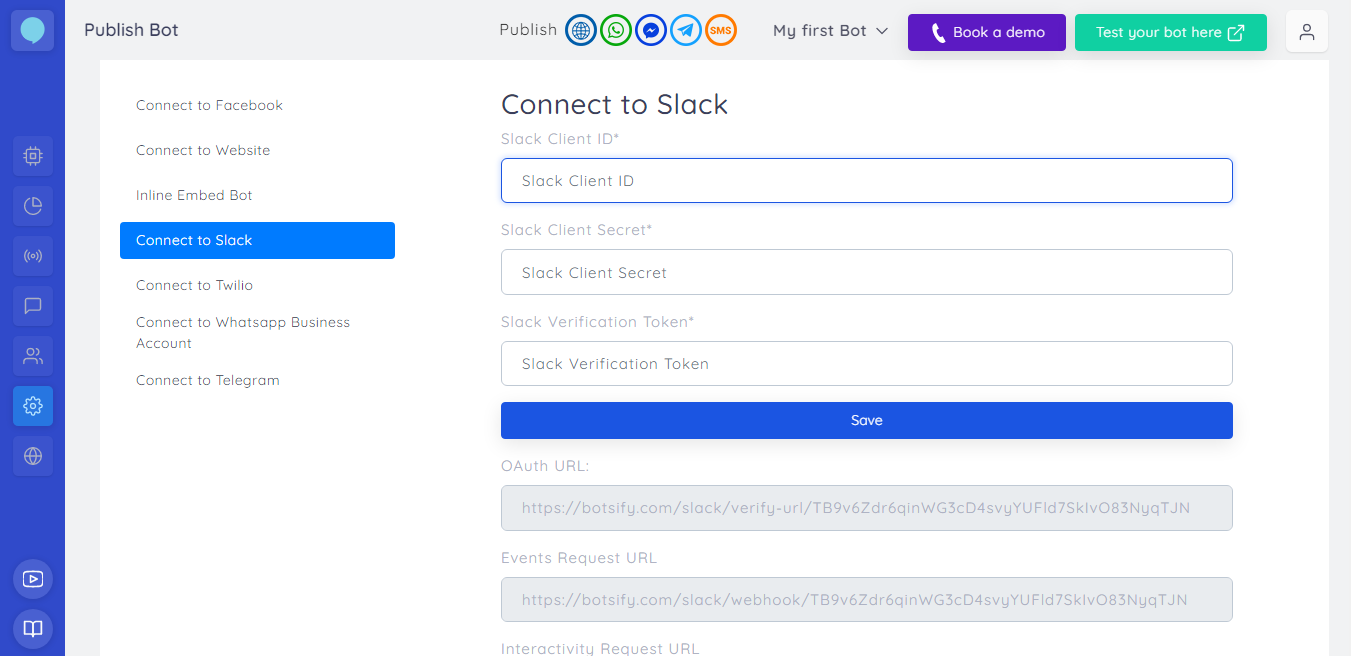
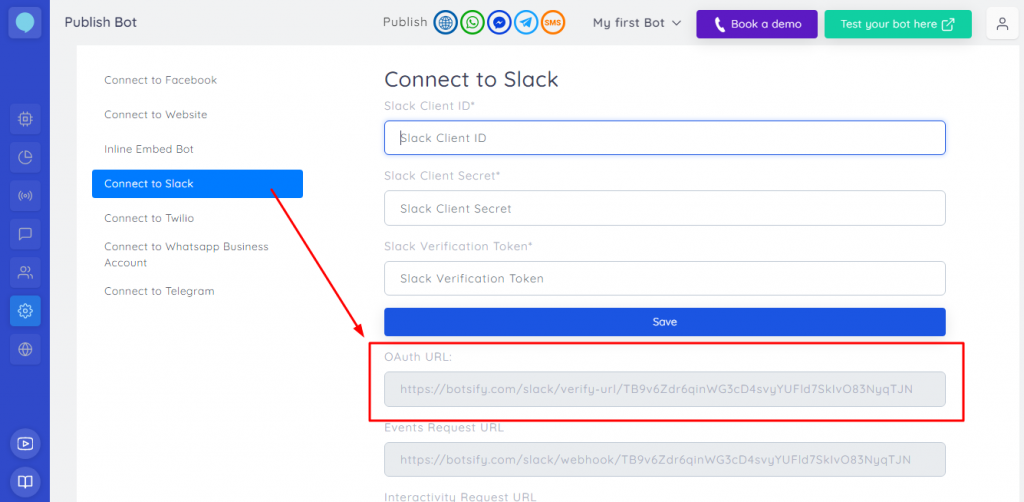
Once you are in, go to Publish bot and head over to connect to Slack

You can see there are steps given here already, what you need to do is follow these steps one by one and your bot will be up and running on slack

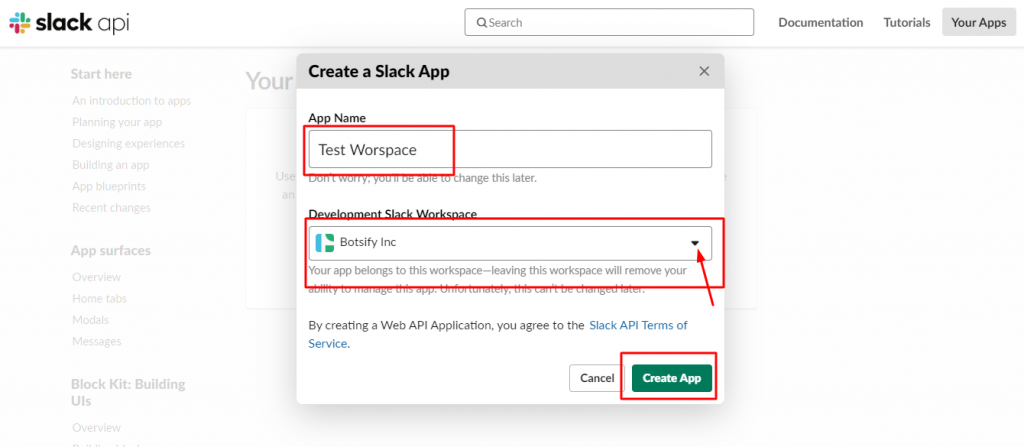
As you can see, the first step given here is ‘Create a new Slack app’ so let’s click on the link given in this step:

Choose a name for your App and then select the workspace you want to connect this bot with. Here I have chosen my Botsify workspace. Then we will click on Create App.

Moving on,

In the sidebar go to Bot Users

and click add a Bot User.

Then click on Add Bot User one more time.

Next up is event subscriptions, let’s go there

Click on this toggle to enable event subscriptions:

Scroll down to subscribe to bot events and click on ‘Add Bot User Event’.

Now in this drop-down, you can select the necessary events given.

However, we suggest you select events with ‘message’ in them but you choose other events as well, all the details of each event are given next to it so you can understand easily.

Then scroll up to Request URL, for this you will have to head over to your botsify dashboard again.

In this section, you can see an Event Request URL is given, copy it from there,


And paste it here:

It will automatically verify the URL and you will be able to save it one done.

Next up we have Interactive components, on this section, you will have to enable interactivity by clicking on this toggle:

A Request URL is required, let’s go back to Botsify dashboard one more time.

Copy the interactivity request URL from here:

Then paste this URL here and hit ‘save changes’:

After that, we will go to Basic Information from the sidebar.

Scroll all the way down to app credentials and copy the Client ID from here:

And paste all credentials in botsify slack credential form.

Click save once you copy-paste all these onto your Botsify dashboard.

Okay now we will move onto OAuth & Permissions, scroll down to Redirect URLs here and click on Add New URLs:

Then copy this URL from Botsify and paste it in the empty field above.

Once the link is pasted, click Save URLs.

And finally, let’s go to Manage Distribution, and click Add to Slack to add this button.

That’s it, your Slack is integrated with Botsify!

Use Story/Media Block with send to messenger button

You can send a story and media block through Send to Messenger button on your website.

Any story or media block you create will be triggered as soon as a user clicks on your Send to Messenger button.

Here’s how to do it:

Go to your Facebook-connected Botsify chatbot and select Growth Tools. When the sidebar expands click on Send to Messenger.


Select a story if you want to initiate a story once a user clicks on your send-to messenger button or chooses a media block.

comment auto responder


Click on Generate Code and you will see the following display options of your send-to messenger button:

messege us

After Scrolling down, Choose the look you want for your send-to-messenger button and copy and paste this code on your website.

You can follow the same steps to send a media block through your send-to-messenger button.

What is Condition in a story and how to use it?

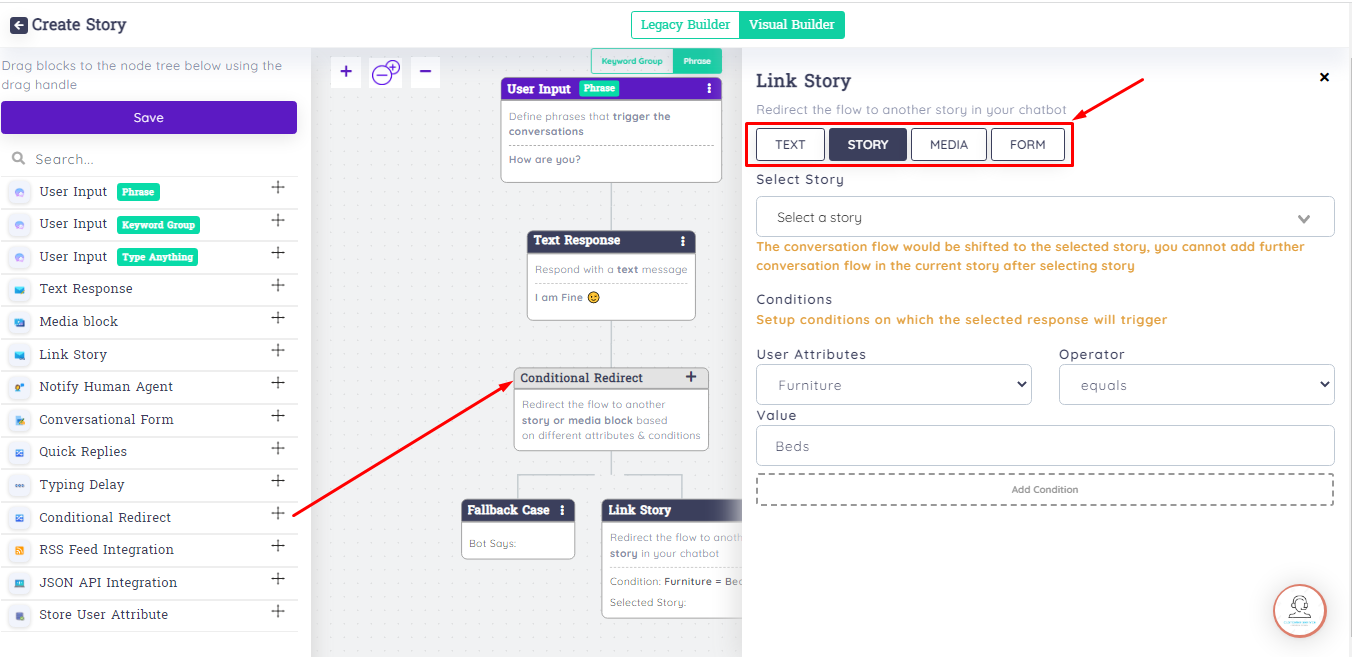
Condition plugin helps bot identify if the user has responded matches any of the predetermined conditions you have set up.

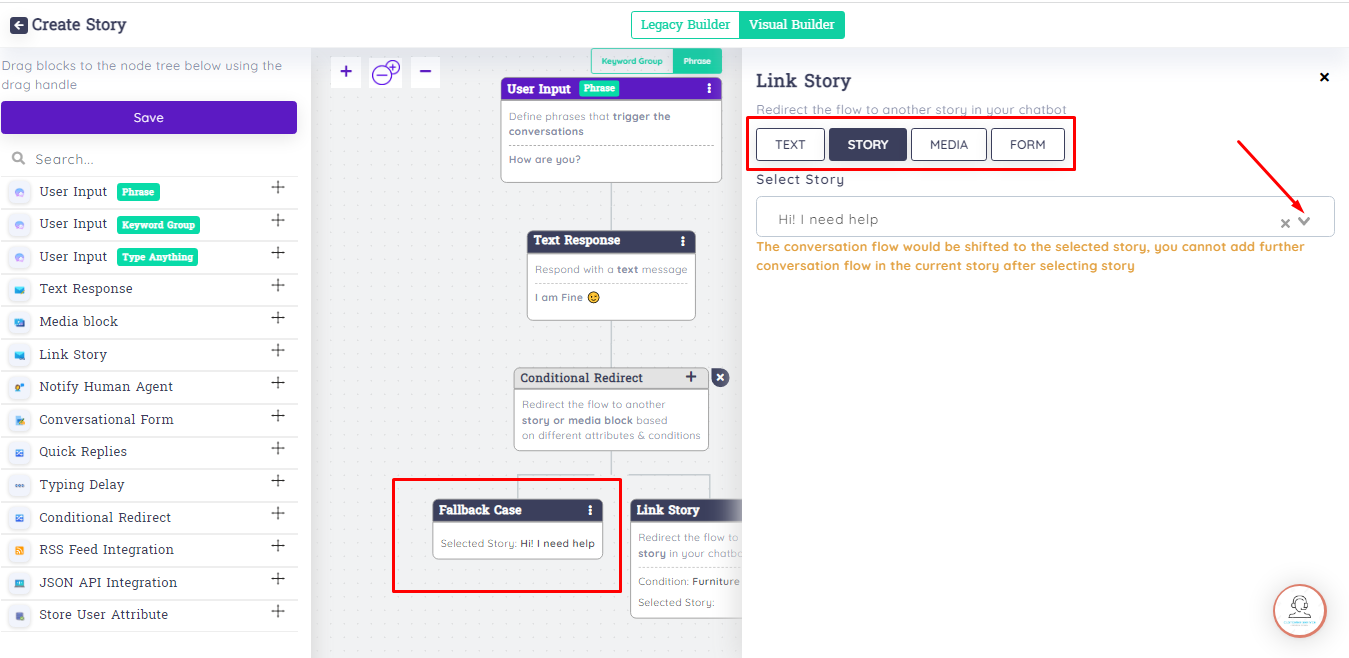
This feature allows your chatbot to figure out if a user interacting falls under the Fallback case condition or the one you set up yourself.

For example, if I want to create a contest chatbot, I will make stories for correct and incorrect answers. To identify if the user has responded with the correct answer I will set up a Condition for my chatbot in which the correct answer will be given.

Similarly, I will set up my ‘fallback case’ with an incorrect answer story, so that any user responds with a message other than my provided answer, the chatbot can determine that it is wrong.

Other than that, I can also set up my chatbot to take no more than one attempt from each user. Your ‘fallback case’ works as the default condition here. Meaning, that a user will begin a conversation with your main story if he/she has not played the contest yet. And alternatively, the condition you created will send the response telling that multiple attempts cannot be made.

Here’s how to set up this condition:

Click “create a story” then choose any ‘user message’ format and write any query you want.

story trigger

Create a new condition here. Choose the story you created as a response to users who have already played your contest in a ‘select story’ dropdown.

Select the datastore you created under the ‘DataStore’ dropdown.

Choose ‘equals’ as your operator from the dropdown.

And finally, add the value ‘True’ and click create.

Now select your ‘Fallback case’ and add your main story (the one to initiate the conversation) and save it.

Save your story and that’s it, you have successfully created all your stories, datastore, and conditions.

How to Clone Media Blocks?

Learn how to clone media blocks to not ruin the original block!


Just like stories, you can clone media blocks too. Whether you have created a slider block or a button block, you can make a copy of every media block and then edit it as you like.


Here’s how:
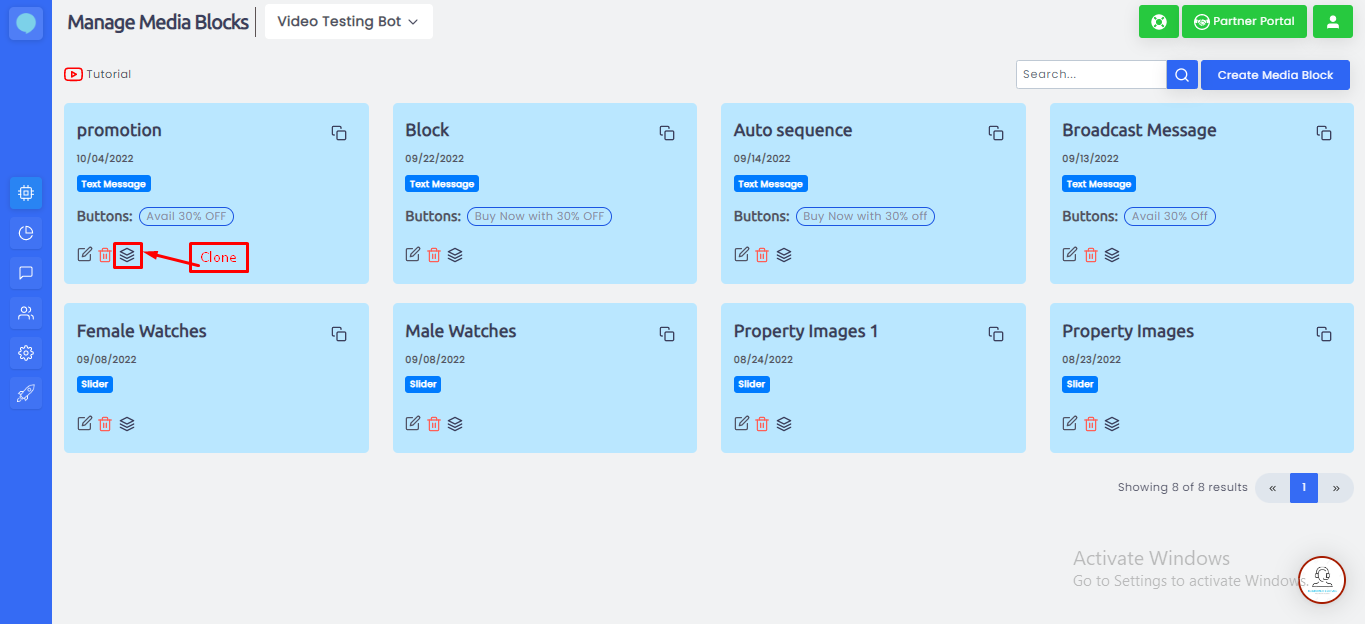
Go to Chatbot AI and click on Media Blocks.


Media Block

Choose the block you want to clone and on the left bottom side of block click on the 3rd option given


Clone Media

And that’s it! Your media block has been cloned.

Save Time by Cloning your Chatbot Story

Creating a smooth flow in the story is mandatory for any user so that your audience can reach to your action call. Most of the flows end up at the same endpoint.

To save your time, we have added this new STORY CLONING feature where you can clone the whole flow and edit it according to each query.

Here’s how you can clone your stories.

From the Left toolbar, Go to Chatbot AI >> Story

story

Create your story and save it. You can learn how to create a story from HERE

Click on the three dots then click on Clone Story and clone it.

Now you will find two same stories with the same flow. Now Click on one of the cloned stories and edit it according to your keywords.

Here’s how you can save time and decrease the chances of mistakes in making the same flow of your story.

Create Customer Engagement through Media Blocks and Story Buttons on Facebook Messenger ads

Facebook has become a business platform these days and for this purpose, Facebook has introduced its Facebook ads Feature.

Facebook ads increase your visibility among your target audience.

In a very low budget, you can reach out to your target audience and generate revenue in a short span of time.

You can create Facebook ads from HERE

You can also embed your action buttons on Facebook ads. It makes it easier to get immediate action and increase impulsive buying.

You can use buttons to embed stories or media blocks together so that your user can use them according to your requirements.

Step 1:

From Botsify Dashboard Go to left ToolBar > Design > Media Blocks

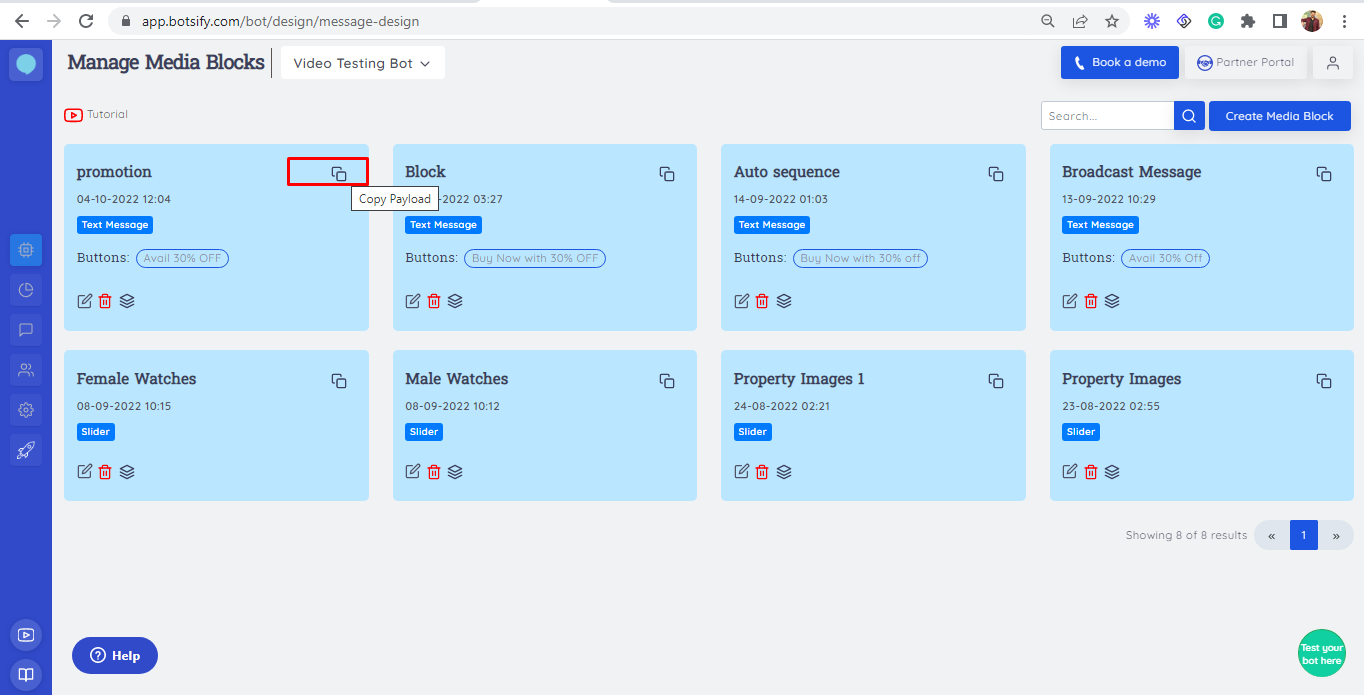
Now “Copy Payload” from your already created Media Block

If you haven’t created a media block Create it now.

Step 2:

Paste the Payload you have copied earlier to the “Bot Payload” field.

Step 3:

“Preview in Messenger” to see if your respective button is set by clicking on the button.

Here’s how your first button will look like in messenger:

Step 4:

Click on the button and you’ll see your action. We have set the link to our Help section to the media block button.

Step 5:

If your user doesn’t want to take any action at the moment, you can give him the option of story continuity by embedding the second button as a second option on the ad.

Apart from the running campaign, this feature can keep your audience engage in your other services too.

Go to Facebook Ad Template page Click on “Add another button”

Step 6:

From Botsify Dashboard, Go to chatbot AI > Story

Copy your respective story payload from “Copy Payload”

Step 7:

Paste your story payload on the Button#2 “Bot Payload” field

Now “Preview it in Messenger”

Step 8:

Here’s how your second button will look like. Click on it and start your story.

You can grab your audience through Facebook advertisement and can create an interesting engagement in Facebook messenger through these media blocks and stories.